domingo, 14 de diciembre de 2014

miércoles, 19 de noviembre de 2014
Parts, functions and locations
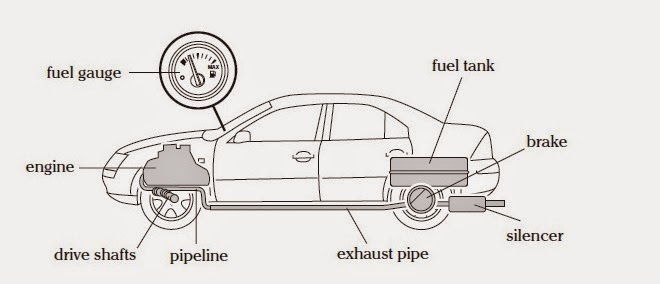
a) Look at the diagram and describe the function of each part:
- Silencer: Makes the car quieter.
- Brake: Makes the car stop.
- Fuel Tank: This stored the fuel.
- Exhaust Pipe: This guides the carbon diopside out of the motor.
- Pipeline: save the liquid of the car.
- Drive Shafts: Makes the directions of the car.
- Engine: Does the car works.
- Fuel Gauge: Show you the level of the fuel in the fuel tank.
b) Write a description of the location of the parts
- The silencer is at the back of the car
- The brake is at the wheels .
- The Fuel tank is on the back wheels.
- The exahust pipe is under the car.
- The pipeline is between of the engine and Drive Shafts.
- The drive shafts are at the front of the car.
- The engine is at the front of the car.
- the Fuel gauge is at front of the car's manubrium .
martes, 21 de octubre de 2014
Product comparison
1. Compare two products from the SOG catalogue.
- The POWERASSIST EOD has fuzewell spike, but it does'nt have a nail file.
- The POWERASSIST does'nt have multi-angle needle nose pliers, but it has philips screwdriver.
- The POWERASSIST EOD has wire crimper, but it does'nt have V-cutter.
- The POWERASSIST is black oxide colour, but it isn't white steel colour.
- The POWERASSIST EOD does'nt have engravable, but ir has can opener.
2. Write a short paragraph (as a conclusion of your comparison)
This two products have a lot of tools that can use, you have many ways to choose how you want the product and what tools you need more, this multitools help you so good; this kind of virtual store are very dinamics and the way interacts with the customer is so good and pretty, I like it.
sábado, 4 de octubre de 2014
Computer Assembly
- Disassemble
- First we have to open the computer case (there are many differents ways to do that).
- Once opened remove the drives, first we removed cd-rom and then we removed the floppy disk drive.
- Lastly extracted all drives´ cables attached to the keyboard then removed the ramp by opening the clips that secure the RAM.
- Next we remove the wireless internet card, we separated it from its case after that i disconnected the microprocessor .
- Then check the microprocessor by releasing the letter.
- And finaly desconnected the motherboard, disconnecting the Aires.
- Reassemble
- First intall the motherboard. secure it conected various kid .
- Then laid microprocessor back into its place and install the microprocessor fun.
- Connect the wireless internet card sliding its casing into place and connecting card to the motherboard.
- Next install the RAM inserted and lock iran into its slot on the motherboard.
- After that we connected the hard drive then the floppy disk drive and then the cd-rom drive.
- And finaly we close the computer case.
Diagram of the individual components of a computer.
 |
| Hard Drive |
 |
| Microprocessor |
 |
| Motherboard |
 |
| CD-Rom |
 |
| RAM |
 |
| Computer´s Case |
viernes, 26 de septiembre de 2014
jueves, 18 de septiembre de 2014
Arduino
Arduino is a tool for making computers that can sense and control more of the physical world than your desktop computer. It's an open-source physical computing platform based on a simple microcontroller board, and a development environment for writing software for the board. Arduino can be used to develop interactive objects, taking inputs from a variety of switches or sensors, and controlling a variety of lights, motors, and other physical outputs.
- It is an open-source project, software/hardware is extremely accessible and very flexible to be customized and extended
- It is flexible, offers a variety of digital and analog inputs, SPI and serial interface and digital and PWM outputs
- It is easy to use, connects to computer via USB and communicates using standard serial protocol, runs in standalone mode and as interface connected to PC/Macintosh computers
- It is inexpensive, around 30 euro per board and comes with free authoring software
- Arduino is backed up by a growing online community, lots of source code is already available and we can share and post our examples for others to use, too!.
The Arduino development environment contains a text editor for writing code, a message area, a text console, a toolbar with buttons for common functions, and a series of menus. It connects to the Arduino hardware to upload programs and communicate with them.
There are many other microcontrollers and microcontroller platforms available for physical computing. Parallax Basic Stamp, Netmedia's BX-24, Phidgets, MIT's Handyboard, and many others offer similar functionality.

Reference:
- http://arduino.cc/en/pmwiki.php?n=Guide/Introduction
- http://www.varesano.net/blog/fabio/what%20arduino%20why%20we%20choose%20it%20what%20can%20we%20do%20it
- http://arduino.cc/en/pmwiki.php?n=Guide/Environment
sábado, 6 de septiembre de 2014
symbols and meaning
- km = kilometre
- + = plus
- g = gravity
- in = inch
- kW = kilowatt
- kg = kilogram
- L = liter
- V = volt
- A = area
- ° = degree
- rpm = Revolutions per minute
- C = Celsius
- km/h = kilometers per hour
- m = meter
- £ = pound
- - = less
- ft = foot
- € = euro
- W = watt
- gal = one centimeter per second squared
Suscribirse a:
Entradas (Atom)